The best way to become familiar with the taking notes in Less Meeting is to take the interactive tutorial. If you have already taken the tutorial or want to learn about something specific about taking notes, here are the items that will be covered in this article:
Open the Meeting
There are many ways to access an upcoming meeting, but the 3 easiest are:
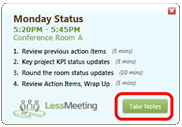
- If you use Outlook, a meeting reminder notification will appear within 5 minutes of the meeting. Click on the "Take Notes" button to open the meeting page.
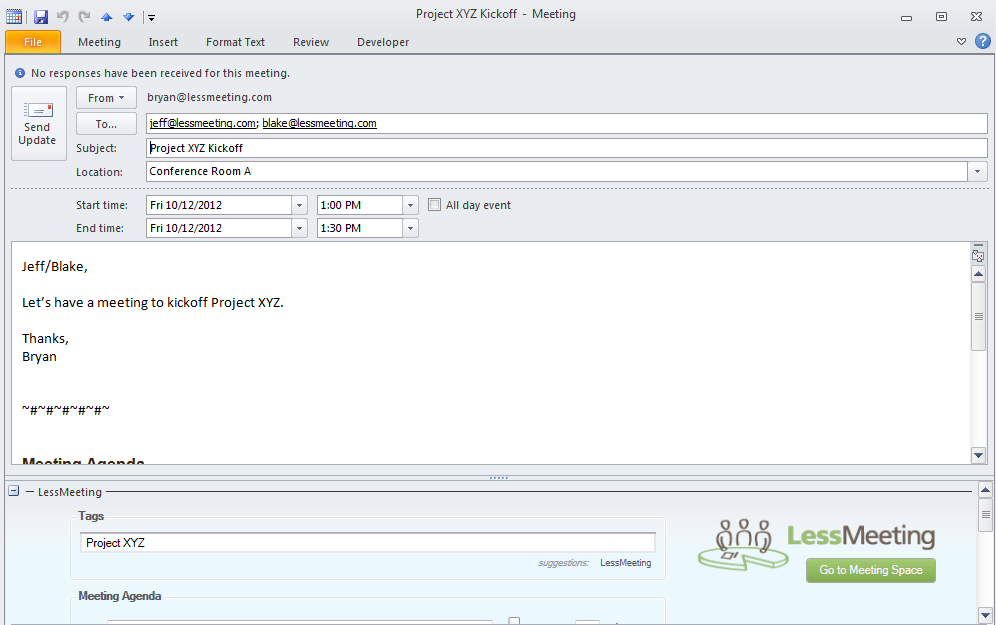
- Open the meeting in Outlook and click on the "Go to Meeting Space" button on the right side of the Less Meeting plugin. Note: This button will only appear when the meeting has successfully synchronized with Less Meeting (which may take a minute or two after the meeting is initially created).
- Login to the Less Meeting website and a link to the meeting will be shown on the dashboard (if the meeting is today). If the meeting isn't scheduled for that day click the Meetings link at the top, which will show all of the upcoming and past meetings as well. For more information about the Meetings page, click here.
If the meeting does not have an agenda already, a popup box will appear asking you to create the agenda.
View the Invite Details
Sometimes it is helpful to view the meeting invitation sent out to get some background on the meeting or to check what the dial-in number is. This can be done from the meeting page by clicking the View Invite button next to the title of the meeting.
For example, web conference links are typically available here.

Start the Meeting Timer
When you are ready to start the meeting click the Start Meeting button at the bottom of the screen.

After starting the meeting the bar at the bottom of the screen helps you keep track of time by showing the current time and how much time is left in the meeting. There is also a tracking bar to show the progress of the meeting.
Note: if you start typing meeting notes without clicking the Start Meeting button, Less Meeting will prompt you to start the meeting.
Take Attendance
The meeting attendees are shown on the right side of the screen with checkboxes. This allows you to capture who showed up to the meeting and who did not.

This list contains all of the individuals invited to the meeting. The icons next to each person’s name indicate whether they accepted or declined the meeting invitation. People who have accepted the meeting will have a  icon next to their name while people who have declined will have a
  icon. For recurring meetings, each person’s historical meeting attendance will also be displayed.
There is a textbox that also allows you to add people to the meeting if they were not on the original invite list.
Take Meeting Notes
Meeting notes are taken in a bulleted/tree structure under each agenda item. Within the meeting notes you can add action items that are assigned to individuals and specify when decisions are made.
Creating a New Note
Under each agenda item there is a large textbox to add notes. Type your note in this area and then click Enter key to save the note and go to the next line. You can alternatively click the  icon to save the meeting notes instead of pressing Enter.
To create a sub-note so that it is nested under the previous note press the Tab key before, during, or after typing in the note and then press Enter to save. Pressing Shift-Tab will outdent the note.

Editing an Existing Note
To edit an existing note, click it and the note will switch into edit mode. When done, either press the Enter key or click the icon to save the note.

When you hover the mouse over an existing meeting note, icons appear that change the way the note appears or is structured.

To indent or outdent an existing note, hover and click the  and
and  icons.
To add a sub-note to an existing note hover over the parent note and click the  icon. This will move the note textbox below the parent note and you can continue adding notes from that point in the structure.
To delete a note and all of the sub-notes under it, hover and click the  icon.
icon.
To create a sub-agenda item out of an existing meeting note, hover and click the  icon. To change a sub-agenda item into a regular note, hover and click the
  icon.
icon.
Rearranging Notes
To move a note and any sub-notes that exist below it, drag-and-drop the meeting note. Notes can also be dragged to different agenda items.

When you first start to drag a note, two buttons will appear next to any existing notes:
- Dropping your dragged note on the Move Before button will move your selected note prior to that one
- Dropping your dragged note on the As Sub-Note button will nest your selected note below that one
Create Action Items
Action items are assigned to meeting attendees to track their follow-up items.
To add an action item within the agenda section either click the "@ Action Item" button on the bottom of the note textbox or type the character @. Start typing in the person’s name who you are assigning the action item to and LessMeeting will auto-complete the name. Press Enter to save the person’s name, then type the action text that you are assigning to that person (i.e. “Talk to finance team about project budget for next year.” Finally, set the date by which the action item is due and save the note.

Action items can also be assigned to multiple people by typing the @ symbol before each person’s name. For example, to assign an action item to Joe and Pete type “@Joe @Pete Follow-up about budget results.”
Action items can also be assigned at the bottom of the meeting page. This is useful when creating follow-up items for the next meeting outside the context of the agenda items.

Action items will show up in the daily digest email if you have it turned on. When action items owed to you are completed, a section in the daily digest will show the task marked as completed.
Create Decisions
To highlight decisions that are made during the meeting you can click the "Decision" button on the bottom of the note textbox or type D: at the beginning of the notes. Decisions will be highlighted and bolded in the meeting notes to show their importance.


Edit Agenda Items
Agenda items can be added or removed at any time by clicking the Edit Agenda link at the top of the Taking Agenda Notes section. This will display a table that allows you to add new agenda items, delete agenda items, change the order of the agenda items, or change the amount of time for the agenda items.

Add Items to the Parking Lot
Discussions that are not included in the meeting agenda but are important and should be brought up at a later time should be added to the parking lot on the right side of the screen below the attendance. Items can be added to the parking lot by typing text into the textbox and either pressing Enter or by clicking the icon
Items can be edited by clicking once on the text, or can be removed from the parking lot by hovering over them and clicking the icon.
Note: If you add a parking lot item to a recurring meeting, the next time you meet you'll be prompted to add that parking lot item to your agenda.

Multiple Note Takers
Less Meeting allows multiple people to take notes simultaneously if they each have Less Meeting accounts. The meeting notes are updated in real-time on everyone’s screen similar to a Google Docs
After the Meeting
End Meeting
When the meeting is completed click the End Meeting button on the bottom of the screen.
You can choose to email the meeting minutes and pick who to email them to, whether it's just yourself, everyone in the meeting, or a custom list you want to create. You also have the option of adding a custom message to the email by clicking the Add a Message link.

When you are done press the Close & Send Minutes button.
Alternatively if you would like to make changes to the meeting notes and send the meeting minutes later you can click the Close Meeting button. After the meeting is closed you can still add/modify notes, change the attendance, and modify action items.
Meeting Quality Score (MQS)
After a meeting is closed a Meeting Quality Score, or MQS, is calculated and displayed on the meeting page. The score will show both positive and negative attributes of the meeting. For example, starting the meeting on time will add to the MQS, but ending late will take away points from the MQS.

The MQS is an effective way to show how good your meeting was at best practices as well as identifying areas for improvement.
Export Meeting Notes
Once the meeting is closed an Export Meeting Minutes link appears at the top right corner of the window. The meeting minutes can be exported to PDF, Microsoft Word, or Wiki format by clicking on the links to further distribute and/or post the notes you took.
Track Action Items
Action items created during your meetings appear on the Action Items page of the Less Meeting website. This page not only shows which action items are still active and when they are due, but it also shows action items that are completed and action items assigned to other people that are owed to you from meetings you have attended.

In addition to the Less Meeting website, the action items assigned to anyone registered with Less Meeting will synchronize with Outlook and Gmail/Google Apps tasks. When the action item is completed it can be checked off in Outlook or Gmail/Google Apps and it will automatically synchronize with the Less Meeting website.